14 janvier 2010


Flash Demo on iPhone via Open Source Gordon Project

http://www.iphoneincanada.ca/iphone-news/flash-demo-on-iphone-via-open-source-gordon-project

What Is On Your iPhone 4G/OS 4.0 Wishlist?


The rumour mill has started regarding the“next” iPhone to grace our grubby hands this summer. We all know that Apple’s ability to keep every detail secret until the last minute is what gets us excited leading up the the release.
Apple is known to slowly release features (*cough* copy and paste *cough*) with regards to both software and hardware. Personally, I am looking forward to a new hardware design with a front facing camera for iChat capabilities, and LED flash with a 5megapixel camera to start. Of course we also can’t leave out better battery life and a higher resolution screen. Are any of these wants wishful thinking?
At the same time, I also enjoy not knowing what is coming next. What will Apple deliver once June/July arrives? Will they respond to the impressive hardware specs of the Google Nexus One(which offers great support through Google Groups, LOL)?
The iPhone 4G Wishlist That People Want
User ThatsMeRight over at MacRumors posted the following “wishlist” for the future iPhone. What items do you think will come true and ones that will never see the light of day?
Hardware wishlist
- 4G network (LTE probably in 2011, but WiMax is already possible).
- New camera. 5MP? Flash? etc. (+ camera shutter)
- Front camera, minimum of 3 MP for video conferences.
- New design
- New WiFi chip (802.11n) (like found in the iPod Touch)
- Better cellular chips of the 3G and 2G networks
- (AM)OLED screen (maybe some extra backlight when you’re outside?)
- Two speakers or “all-around-sound” and of course better audio quality.
- Better 3D graphics
- Up to 64GB of space. Declare 16GB the dead, 8GB ‘low-quality’ model like iPod Touch
- New processor and more RAM
- Infrared
- Higher resolution: High Definition?!
- FM transmitter
- Pedometer
- New exterior (design)
- Removable battery
- Built-in RFID (radio-frequency identification) technology
- Fingerscanner
- LED light in the home button (e.g. blue with new message, green incoming call etc.) with ability to turn it off
- Powermat support
- Touch-sensitive places at all corners (at left and right of home button and top right and top left) (so you can use an app without blocking your view with your hands and it would be a great improvement like ’scrolling’ or something like that) with easy turn on and off like double tap in corners at the same time (you won’t have an ‘accident double tap at two corners at the same time haha).
- And of course… better battery life
iPhone 4.0 software
- Redesigned UI
- Multitasking (kinda like how it’s done in Safari with multiple pages)!
- Extentions of Voice Control: what about creating an email just by telling the iPhone too?
- Flash (and of course the choice to turn it off for the people who think it’s oldfashion)
- File browsing
- Bluetooth restrictions should be lifted (file transfer)
- More abilities to customize your iPhone: what about wallpapers on your homescreen?
- File browsing
- A ‘unity inbox’ for emails.
- Spotlight extension: search the web too!
- iPhone notes app needs an upgrade
- Ability to hide applications (for example that the hidden apps just appear in a special list)
- Categories/Folders: seriously, categories/folders would be nice
- Character counter in the texting app…
- Turn things on and off easier (less steps)
- Radio application (apperently the 3Gs is able to support this for sure)
- Native editing of word and excel docs. Let alone editing of pages/numbers etc.
- 720p video out
Google Maps navigation/latitude/etc.
- Wireless syncing
- Updates of Voice Control (especially in languages other than English) and new features (e.g. “Google Apple” and it’s going to Google for Apple or compose a mail via your voice etc.)
- Profiles
- Text message counter
- New iPod app: what about deleting a song, or naming playlists?
- Support for wider format of video files
I can guarantee you that Apple will never produce an iPhone with a removable battery. The issue with the iPhone battery is that it doesn’t last long because people actually use their iPhone all the time. Twitter, Facebook, games, apps, etc, the list goes on. No battery can keep up to our endless desire for usage unless the next iPhone can be recharged by…solar power?!

13 janvier 2010


Programming Apple Push Notification Services


One of the key limitations of the iPhone is its constraint on running applications in the background. Because of this, applications cannot keep running in the background when the user switches to another application. So, applications that require a constant state of connectivity (such as social networking applications) will not be able to receive timely updates.
To remedy this limitation, Apple released the Apple Push Notification Service (APNs). The APNs is a service that allows your device to be constantly connected to Apple's push notification server. When you want to send a push notification to an application installed on the users' devices, you (the provider) can contact the APNs so that it can deliver a push message to the particular application installed on the intended device.
In this article, you will learn how to perform the various steps needed to create an iPhone application that uses the APNs.

Generating a Certificate Request

The first step to using the APNs is to generate a certificate request file so that you can use it to request for a development SSL certificate later on.
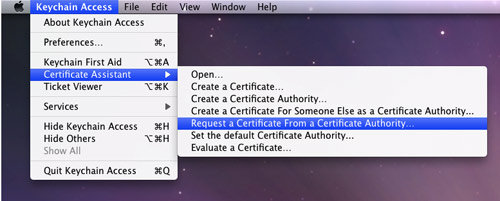
1. Launch the Keychain Access application in your Mac OS X.
2. Select Keychain Access'Certificate Assistant'Request a Certificate From a Certificate Authority (see Figure 1):

Figure 1. Generating a certificate request
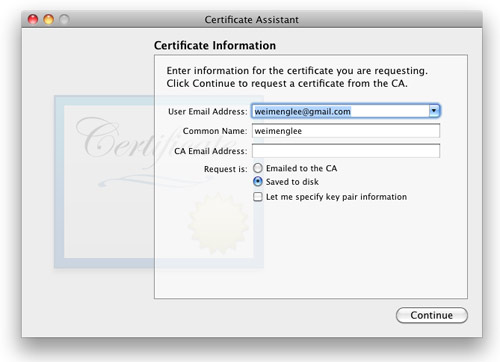
3. Enter the information required and check the Saved to disk option. Click Continue (see Figure 2).

Figure 2. Saving the certificate request to disk
4. Save the certificate request using the suggested name and click Save (see Figure 3): Click Done in the next screen.

Figure 3. Naming the certificate request

Creating an App ID

Each iPhone applications that uses the APNs must have a unique application ID that uniquely identifies itself. In this step, you will learn how to create an App ID for push notification.
1. Sign in to the iPhone Developer Program at: http://developer.apple.com/iphone/. Click on the iPhone Developer Program Portal on the right of the page (see Figure 4).

Figure 4. Launching the iPhone Developer Program Portal
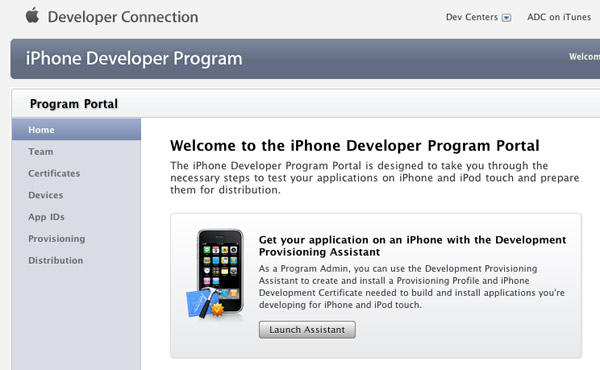
2. You should see the welcome page (see Figure 5).

Figure 5. The welcome screen of the iPhone Developer Program Portal
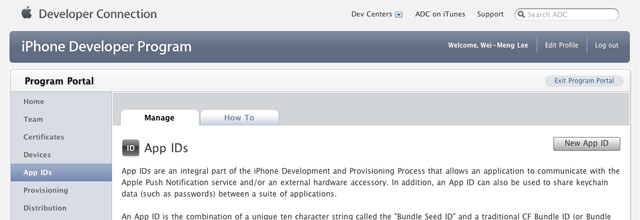
3. Click on the App IDs tab on the left and then click on the New App ID button (see Figure 6).

Figure 6. Clicking on the App ID tab
4. Enter "PushAppID" for the Description and select Generate New for the Bundle Seed ID. For the Bundle Identifier, enternet.learn2develop.MyPushApp. Click Submit (see Figure 7).
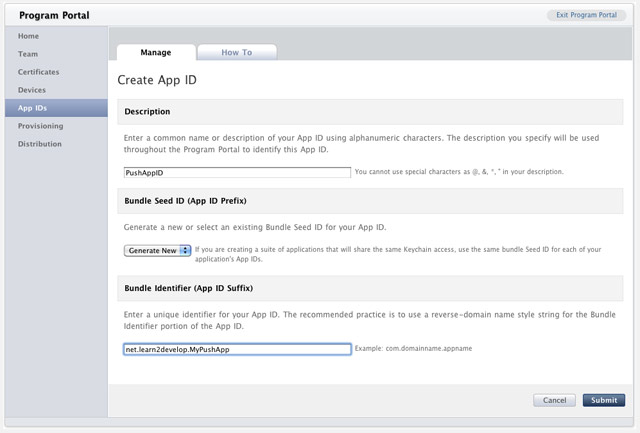
Figure 7. Creating a new App ID
5. You should now see the App ID that you have created (together with those you have previously created) (see Figure 8).

Figure 8. Viewing the newly created App ID

Configuring an App ID for Push Notifications

Once an App ID is created, you need to configure it for push notifications.
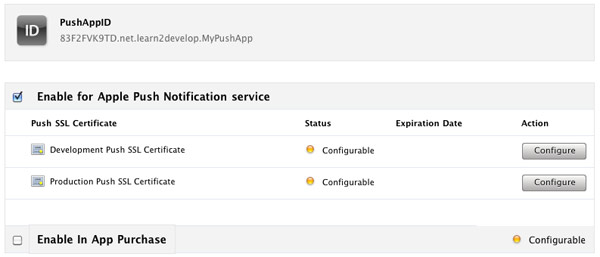
1. To configure an App ID for push notification, you need to click the Configure link displayed to the right of the App ID. You will now see the option (see Figure 9).

Figure 9. Configuring an App ID for push notification service
Check the Enable for Apple Push Notification service option and click the Configure button displayed to the right of the Development Push SSL Certificate.
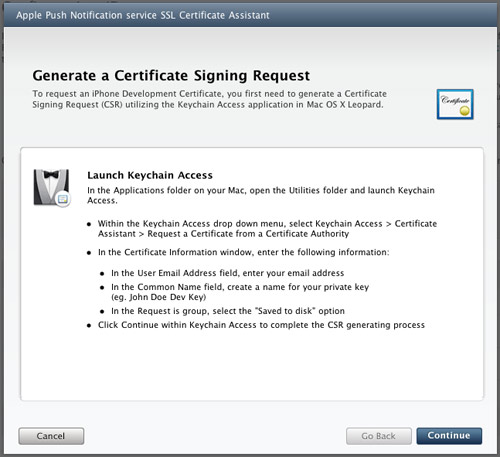
2. You will now see the Apple Push Notification service SSL Certificate Assistant screen. Click Continue (see Figure 10).

Figure 10. The Apple Push Notification service SSL Certificate Assistant screen
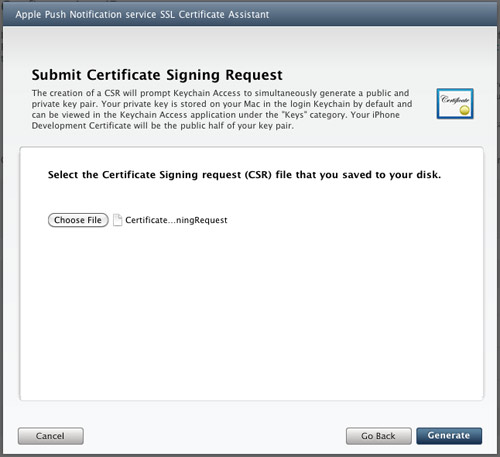
3. Click the Choose File button to locate the Certificate Request file that you have saved earlier. Click Generate (see Figure 11).

Figure 11. Generating the SSL certificate
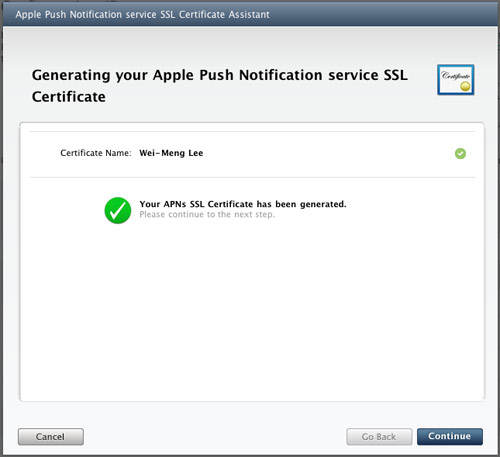
4. Your SSL Certificate will now be generated. Click Continue (see Figure 12).

Figure 12. The APNs SSL certificate that is generated
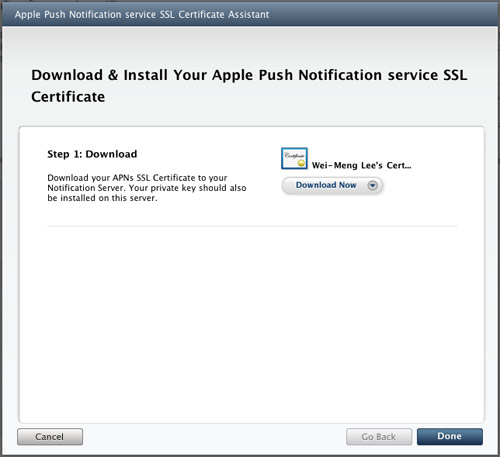
5. Click the Download Now button to download the SSL Certificate. Click Done (see Figure 13).

Figure 13. Downloading the certificate generated
6. The SSL Certificate that you download is named aps.developer.identity.cer. Double-click on it to install it in the Keychain Access application (see Figure 14). The SSL certificate will be used by your provider application so that it can contact the APNs to send push notifications to your applications.
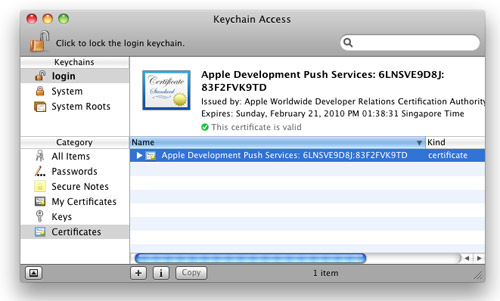
Figure 14. Installing the generated certificate into the Keychain Access application

Creating a Provisioning Profile

The next step is to create a provisioning profile so that your application can be installed onto a real device.
1. Back in the iPhone Development Program Portal, click on the Provisioning tab and click on the New Profile button (see Figure 15).

Figure 15. Selecting the Provisioning tab
2. Type in MyDevicesProfile as the profile name. Select PushAppID as the App ID. Finally, check all the devices that you want to provision (you can register these devices with the iPhone Developer Program Portal through the Devices tab). Click Submit (see Figure 16).
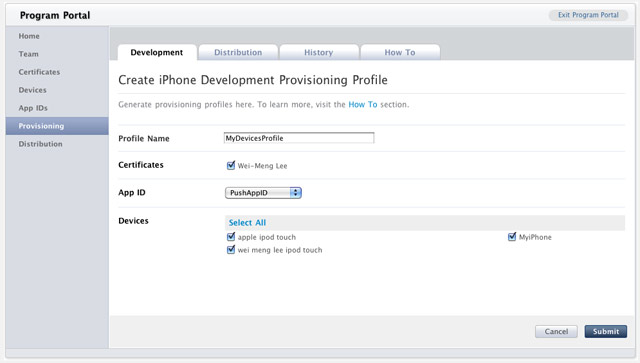
Figure 16. Creating a new provisioning profile
3. The provisioning profile will now be pending approval. After a while, you will see it appear. Click on the Download button to download the provisioning profile (see Figure 17).

Figure 17. Pending the approval of the provisioning profile
4. The downloaded provisioning profile is named MyDevicesProfile.mobileprovision.

Provisioning a Device

With the provision profile created, you will now install it onto a real device.
1. Connect your iPhone or iPod Touch to your Mac.
2. Drag and drop the downloaded MyDevicesProfile.mobileprovision file onto the Xcode icon on the Dock.
3. Launch the Organizer application from within Xcode and select the device currently connected to your Mac. You should see the MyDevicesProfile installed on the device (see Figure 18).
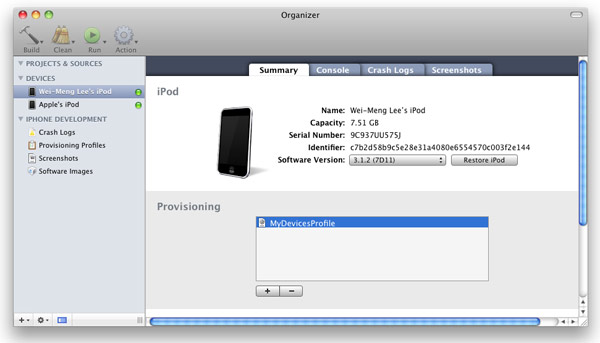
Figure 18. Viewing the installed provisioning profile

Creating the iPhone Application

1. In Xcode, create a new View-Based Application project and name it as ApplePushNotification.
2. Drag and drop a WAV file (shown as beep.wav in this example) onto the Resources folder in Xcode (see Figure 19).
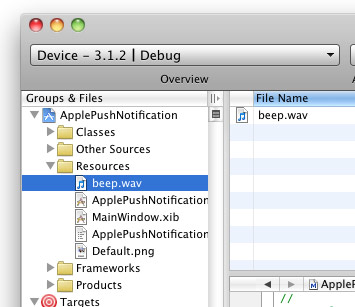
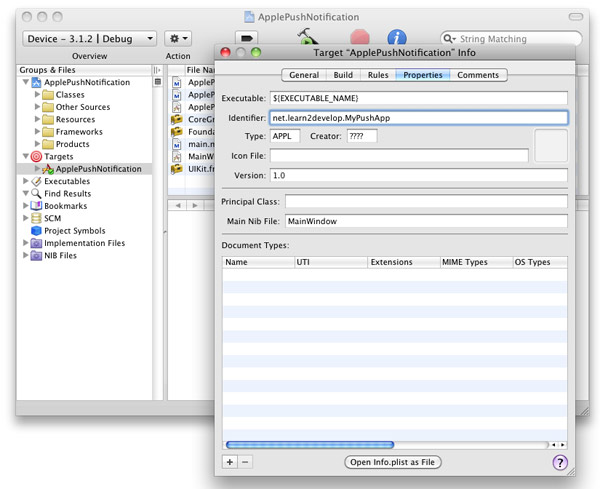
Figure 19. Adding a WAV file to the project
3. Expand on the Targets item in Xcode and select the ApplePushNotification item. Press Command-I. In the Info window, click the Properties tab (see Figure 20).

Figure 20. Entering the App ID for the application
In the Identifier textbox, type <net.learn2develop.MyPushApp.
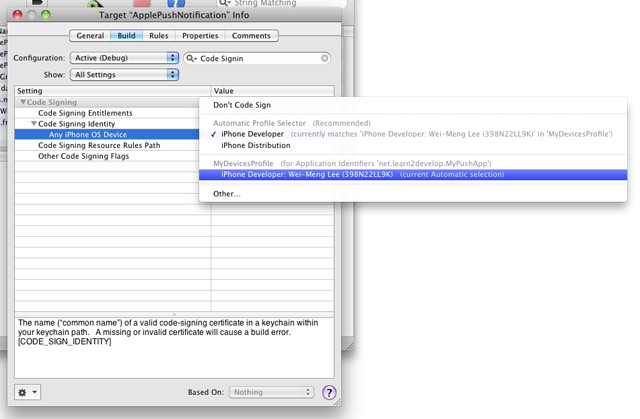
4. Click on the Build tab and type "Code Signing" in the search box. In the Any iPhone OS Device item, select the profile as shown in Figure 21:

Figure 21. Selecting the profile for code signing
5. In the ApplePushNotificationAppDelegate.m file, type the following code in bold:
#import "ApplePushNotificationAppDelegate.h"
#import "ApplePushNotificationViewController.h"
 
@implementation ApplePushNotificationAppDelegate
 
@synthesize window;
@synthesize viewController;
 
- (void)applicationDidFinishLaunching:(UIApplication *)application {    
    [window addSubview:viewController.view];
    [window makeKeyAndVisible];
 
    NSLog(@"Registering for push notifications...");    
    [[UIApplication sharedApplication] 
        registerForRemoteNotificationTypes:
        (UIRemoteNotificationTypeAlert | 
         UIRemoteNotificationTypeBadge | 
         UIRemoteNotificationTypeSound)];
 
}
 
- (void)application:(UIApplication *)app didRegisterForRemoteNotificationsWithDeviceToken:(NSData *)deviceToken { 
 
    NSString *str = [NSString 
        stringWithFormat:@"Device Token=%@",deviceToken];
    NSLog(str);
 
}
 
- (void)application:(UIApplication *)app didFailToRegisterForRemoteNotificationsWithError:(NSError *)err { 
 
    NSString *str = [NSString stringWithFormat: @"Error: %@", err];
    NSLog(str);    
 
}
 
- (void)application:(UIApplication *)application didReceiveRemoteNotification:(NSDictionary *)userInfo {
 
    for (id key in userInfo) {
        NSLog(@"key: %@, value: %@", key, [userInfo objectForKey:key]);
    }    
 
}
 
- (void)dealloc {
    [viewController release];
    [window release];
    [super dealloc];
}
 
@end
6. Press Command-R to test the application on a real device. Press Shift-Command-R in Xcode to display the Debugger Console window. Observe carefully the device token that is printed (see Figure 22). In the figure below, the token is:38c866dd bb323b39 ffa73487 5e157ee5 a85e0b7c e90d56e9 fe145bcc 6c2c594b. Record down this device token (you might want to cut and paste it into a text file).
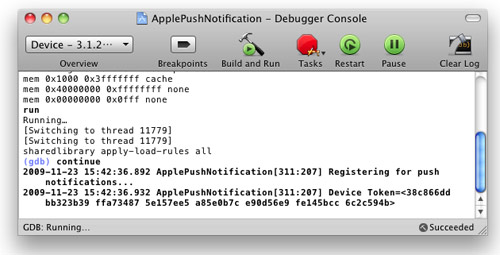
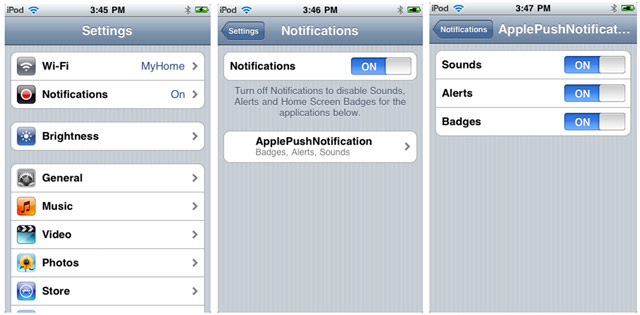
Figure 22. Viewing the device token for push notification
7. If you go to the Settings application on your iPhone/iPod Touch, you will notice that you now have the Notifications item (see Figure 23).

Figure 23. Viewing the Notifications item in the Settings application

Creating the Push Notification Provider

A Push Notification provider is an application written by the application's developer to send push notifications to the iPhone application through the APNs.
Here are the basic steps to send push notifications to your applications via the Apple Push Notification Service (APNs):
1. Communicate with the APNs using the SSL certificate you have created earlier.
2. Construct the payload for the message you want to send.
3. Send the push notification containing the payload to the APNs.
The APNs is a stream TCP socket that your provider can communicate using a SSL secured communication channel. You send the push notification (containing the payload) as a binary stream. Once connected to the APNs, you should maintain the connection and send as many push notifications as you want within the duration of the connection.
Tip: Refrain from opening and closing the connections to the APNs for each push notification that you want to send. Rapid opening and closing of connections to the APNs will be deemed as a Denial-of-Service (DOS) attack and may prevent your provider from sending push notifications to your applications.
The format of a push notification message looks like Figure 24 (figure from Apple's documentation):

Figure 24. Format of a push notification message
For more details, please refer to Apple Push Notification Service Programming Guide.
The payload is a JSON formatted string (maximum 256 bytes) carrying the information you want to send to your application. An example of a payload looks like this:
{
    "aps": { 
        "alert" : "You got a new message!" ,
        "badge" : 5, 
        "sound" : "beep.wav"},
     "acme1" : "bar", 
     "acme2" : 42
}
To save yourself the trouble in developing a push notification provider from scratch, you can use the PushMeBabyapplication (for Mac OS X) written by Stefan Hafeneger (Get it here).
1. Open the PushMeBaby application in Xcode.
2. Right-click on the Resources folder in Xcode and select Add Existing Files…. Select theaps.developer.identity.cer file that you have downloaded earlier (see Figure 25).
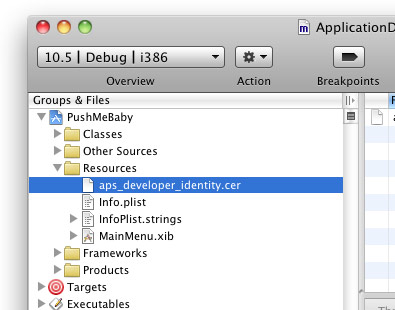
Figure 25. Adding the SSL certificate to the application
3. In the ApplicationDelegate.m file, modify the code as shown in bold below:
- (id)init {
    self = [super init];
    if(self != nil) {
        self.deviceToken = @"38c866dd bb323b39 ffa73487 5e157ee5 a85e0b7c e90d56e9 fe145bcc 6c2c594b";
 
        self.payload = @"{\"aps\":{\"alert\":\"You got a new message!\",\"badge\":5,\"sound\":\"beep.wav\"},\"acme1\":\"bar\",\"acme2\":42}";
 
        self.certificate = [[NSBundle mainBundle] 
            pathForResource:@"aps_developer_identity" ofType:@"cer"];
    }
    return self;
}
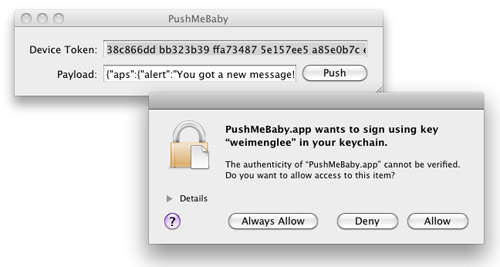
4. Press Command-R to test the application. You will be asked to grant access to the certificate. Click Always Allow (see Figure 26):

Figure 26. Granting access to the SSL certificate
On the iPhone/iPod Touch, ensure that the ApplePushNotification application is not running. To send a message to the device, click the Push button. The server essentially sends the following message to the Apple Push Notification server:
{
    "aps": { 
        "alert" : "You got a new message!" ,
        "badge" : 5, 
        "sound" : "beep.wav"},
     "acme1" : "bar", 
     "acme2" : 42
}
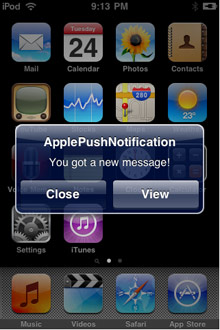
5. If the message is pushed correctly, you should see the notification as shown in Figure 27.

Figure 27. Receiving a Push Notification message
6. If you now debug the ApplePushNotification application by pressing Command-R and send a push message from the PushMeBaby application, the Debugger Console window will display the following outputs:
2009-11-24 21:11:49.182 ApplePushNotification[1461:207] key: acme1, value: bar
2009-11-24 21:11:49.187 ApplePushNotification[1461:207] key: aps, value: {
    alert = "You got a new message!";
    badge = 5;
    sound = "beep.wav";
}
2009-11-24 21:11:49.191 ApplePushNotification[1461:207] key: acme2, value: 42


From http://mobiforge.com/developing/story/programming-apple-push-notification-services