So far, much mobile developer attention has been fixated on the iPhone SDK released by Apple to build native iPhone applications. This is understandable, since with the SDK you can write native iPhone apps that take full advantage of the capabilities provided by the device, such as accessing the accelerometer, the camera, as well as obtain geographical locations using Core Location.
However, building Web applications for the iPhone has advantages too. For example, there is no need to wait for approval from Apple, as in the case of hosting the applications in AppStore. Also, the tools provided by Apple makes it very easy to build Web applications that look just like native iPhone applications. And when it comes to developers' skill-sets, developing Web applications is far easier than building native applications - all you need is some Javascript skills and you are ready to go!
In this article, I will take you through the Dashcode tool provided by Apple (part of the iPhone SDK; hence you need to download it first) to build compelling Web applications for the iPhone.
Trying Out the Various Templates
When you first launch Dashcode (the easiest way to launch it is through Spotlight), you will see that Dashcode has already created some templates for you to build your Web applications quickly (see Figure 1).
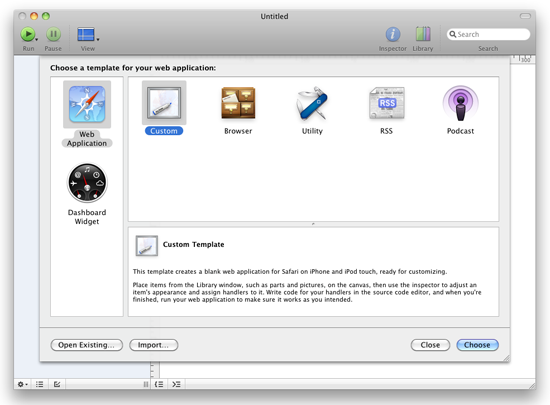 Figure 1
: The various templates provided by Dashcode
The best way to learn is to select each template (other than the Custom template) and examine the content of each application. When you have selected a template, examine their contents and press Command-r to test the application on the iPhone Simulator. Go ahead and have fun with each template. When you have enough fun and get yourself acquainted with the environment, come back and we shall create an iPhone Web application from scratch and you will see how each part is built.
Building the UI
Alright, now that you are back, create a new Custom project In Dashcode. Notice that by default, Dashcode created a content and a footer parts for you (see Figure 2). Parts are the various views that you seen on your Web applications, such as buttons, text, etc. For this section, you will create a simple currency convertor Web application for the iPhone.
 Figure 2
: The parts in the Custom template
Select each of these parts and press the delete key. We shall delete these two parts and add our own parts manually.
Using the Library (Window'Show Library), drag-and-drop a Stack Layout part to the design surface (see Figure 3).
 Figure 3
: Using the Library to drag and drop parts onto your application
Expand the stackLayout part and you should see that it contains two subviews - view1 and view2. Select view1 and change its size to 320px by 356px (see Figure 4) via the Inspector window (Window'Show Inspector). Do the same for view2.
 Figure 4
: Changing the size for view1 and view2 via the Inspector window
Double-click on view1 and rename it as mainScreen. Do the same for view2 and rename it as settings (see Figure 5).
 Figure 5
: Renaming the two subviews
In the Library, drag-and-drop the Rounded Rectangle Shape part onto the mainScreen view (see Figure 6).
 Figure 6
: Adding the Rounded Rectangle Shape part to the subview
It its Inspector window, select the Fill & Stroke tab and in the Style tab select Gradient fill (see Figure 7) and select two colors.
 Figure 7
: Using the gradient fill to fill the part
Select the Effects tab and check the Glass and Recess checkboxes (see Figure 8).
 Figure 8
: Adding glass effect to the part
Select the Metrics tab and select the Absolute layout (see Figure 9).
 Figure 9
: Using absolute layout for parts positioning
Add the following parts to the Rounded Rectangle Shape part (see Figure 10) and name them as shown:
- Text
- TextField
- Pop-up Menu
- Push Button
 Figure 10
: Adding additional parts to the subview
Select the settings subview and repeat the same steps you have performed above. Figure 11 shows the parts added to the settings subview.
 Figure 11
: Populating the settings subview
You are now ready to view the application on the iPhone Simulator. Press Command-r to view the application on the iPhone Simulator (see Figure 12). Notice that the application is hosted by mobile Safari on the iPhone.
 Figure 12
: Viewing the application on the iPhone Simulator
Notice that you can only see the mainScreen subview. To see the settings subview, you need to write some code to navigate to it from the mainScreen subview.
Coding the Application
So you are now ready to write some code. With the mainScreen subview selected, right-click on the Settings button and select Events'onclick (see Figure 13).
 Figure 13
: Creating an event handler for the onclick event
You will be asked to name the event handler for this event. Name it as shown in Figure 14.
 Figure 14
: Naming the handler for the event
Notice that the code editor now appears at the bottom of the designer (see Figure 15).
 Figure 15
: The code editor where you can add your code
Enter the following code:
function btnSettings_ClickHandler(event)
{
    var views = document.getElementById('stackLayout');
    var settings = document.getElementById('settings');
    if (views && views.object && settings) {
        views.object.setCurrentView(settings);
    }
}
Select the settings subview and right-click on the Save Settings button and select Events'onclick. Name the handler as btnSave_ClickHandler. Enter the following code:
function btnSave_ClickHandler(event)
{
    var views = document.getElementById('stackLayout');
    var front = document.getElementById('mainScreen');
    if (views && views.object && front) {
        views.object.setCurrentView(front, true);
    }
}
Test the application again by pressing Command-r. This time, you will be able to navigate to the settings view by tapping on the Settings button in the mainScreen subview (see Figure 16).
Figure 16. Tapping on the Settings button navigates to the settings subview
Database Access
So far, your application displays two screens where you can perform some currency conversion as well as set the exchange rates for the different currencies. For simplicity, I am going to assume that you are converting the currencies into Singapore Dollars (SGD). All the exchange rates would be based on the SGD as the base currency.
To allow the users to store their own exchange rates, you will make use of the local database feature as defined in HTML 5 (which is supported by Mobile Safari). Doing so allows users of your application to store the exchange rate locally on their iPhones.
In the main.js file, add the following lines of code for performing database operations:
var database = null;                           // The client-side database
var DB_tableName = "CurrencyKeyValueTable";    // database name

// Function: initDB() - Init and create the local database, if possible
function initDB()
{
    try {
        if (window.openDatabase) {
            database = openDatabase("ExchangeRatesDB", "1.0",
                                    "Exchange Rates Database", 1000);
            if (database) {
                database.transaction(function(tx) {
                    tx.executeSql("SELECT COUNT(*) FROM " + DB_tableName, [],
                    function(tx, result) {
                        loadRates();
                    },
                    function(tx, error) {
                        // Database doesn't exist. Let's create one.
                        tx.executeSql("CREATE TABLE " + DB_tableName +
                        " (id INTEGER PRIMARY KEY," +
                        "  key TEXT," +
                        "  value TEXT)", [], function(tx, result) {
                            initRates();
                            loadRates ();
                        });
                    });
                });
            }
        }
    } catch(e) {
        database = null;
    }
}

// Function: initRates() - Initialize the default exchange rates
function initRates()
{
    if (database) {
        database.transaction(function (tx) {
            tx.executeSql("INSERT INTO " + DB_tableName +
                " (id, key, value) VALUES (?, ?, ?)", [0, 'USD', 1.44]);
            tx.executeSql("INSERT INTO " + DB_tableName +
                " (id, key, value) VALUES (?, ?, ?)", [1, 'EUR', 2.05]);
            tx.executeSql("INSERT INTO " + DB_tableName +
                " (id, key, value) VALUES (?, ?, ?)", [2, 'AUS', 1.19]);
        });
    }
}

// Function: loadRates() - Load the currency exchange rates from DB
function loadRates()
{
    var element;
    var popUpElement = document.getElementById('popupConvertTo');

    if (database) {
        database.transaction(function(tx) {
            tx.executeSql("SELECT key, value FROM " + DB_tableName, [],
            function(tx, result) {
                for (var i = 0; i < result.rows.length; ++i) {
                    var row = result.rows.item(i);
                    var key = row['key'];
                    var value = row['value'];

                    //---populate the pop-up menu part---
                    popUpElement.options[i].text = key;
                    popUpElement.options[i].value = value;

                    if (key == 'USD') {
                        element = document.getElementById('txtUSD');
                    }
                    else {
                        if (key == 'EUR') {
                            element = document.getElementById('txtEUR');
                        }
                        else if (key == 'AUS') {
                            element = document.getElementById('txtAUS');
                        }
                    }
                    element.value = value;
                }
            },
            function(tx, error) {
                showError('Failed to retrieve stored information from database - ' +
                    error.message);
            });
        });
    }
    else {
        loadDefaultRates();
    }
}

// Function: saveRates() - Save the currency exchange rates into DB
function saveRates()
{
    if (database) {
        var elementUSD = document.getElementById('txtUSD');
        var elementEUR = document.getElementById('txtEUR');
        var elementAUS = document.getElementById('txtAUS');

        database.transaction(function (tx) {
            tx.executeSql("UPDATE " + DB_tableName + " SET key = 'USD',
                value = ? WHERE id = 0", [elementUSD.value]);
            tx.executeSql("UPDATE " + DB_tableName + " SET key = 'EUR',
                value = ? WHERE id = 1", [elementEUR.value]);
            tx.executeSql("UPDATE " + DB_tableName + " SET key = 'AUS',
                value = ? WHERE id = 2", [elementAUS.value]);
        });
    }
    loadRates();
}

// Function: deleteTable() - Delete currency exchange table from DB
function deleteTable()
{
    try {
        if (window.openDatabase) {
            database = openDatabase("ExchangeRatesDB", "1.0",
                                    "Exchange Rates Database");
            if (database) {
                database.transaction(function(tx) {
                    tx.executeSql("DROP TABLE " + DB_tableName, []);
                });
            }
        }
    } catch(e) {
    }
}

// Function: loadDefaultRates() - Load the default exchange rates
function loadDefaultRates()
{
    var popUpElement = document.getElementById('popupConvertTo');
    var element = document.getElementById('txtUSD');
    element.value = "1.44";
    popUpElement.options[0].text = "USD";
    popUpElement.options[0].value = element.value;

    element = document.getElementById('txtEUR');
    element.value = "2.05";
    popUpElement.options[1].text = "EUR";
    popUpElement.options[1].value = element.value;

    element = document.getElementById('txtAUS');
    element.value = "1.19";
    popUpElement.options[2].text = "AUS";
    popUpElement.options[2].value = element.value;
}
The database code above is pretty straightforward - store the exchange rates inside the database and populate the pop-up menu part when the rates are retrieved.
Modify the load() function as follows:
//
// Function: load()
// Called by HTML body element's onload event when the Web application is ready to
// start
//
function load()
{
    dashcode.setupParts();

    initDB();
    if (!database) {
        loadDefaultRates();
    }
}
Press Command-r to test the application. When the application is loaded, the pop-up menu will now display the three different currencies (see Figure 17).
Figure 17. The pop-up menu part displaying the different currencies
When you tap on the Settings button, the exchange rates would also be displayed in the settings subview (see Figure 18).
Figure 18. The exchange rates displayed in the settings subview
Performing the Conversion
You are now ready to perform the actual conversion of the currencies. In Dashcode, select the mainScreen subview and right-click on the Convert! Button and select Events'onclick (see Figure 19).
Figure 19. Handling the onclick event for the Convert! button
Name the event handler as btnConvert_ClickHandler and code it as follows:
function btnConvert_ClickHandler(event)
{
    var amount = document.getElementById("txtAmount").value;
    var rates = document.getElementById("popupConvertTo").value;
    var result = amount * rates;
    alert(result);
}
Press Command-r to test the application. Enter an amount and select the currency to convert. Tapping on the Convert! button will now display the amount converted (see Figure 20).
Figure 20. Try converting some currencies!
Converting your Web Application into an iPhone Native Application
Now that your application is completed, you may deploy your application onto a Web server so that users can access your application through the Safari browser on their iPhones. However, since this is a Web application, the user must have access to the Internet, or else there is no way to access your application. And since our application does not make use of any server-based data, it is a good candidate to convert into a native iPhone application. The easiest way would be to host the Web application within the Safari browser, which is represented by the WebView view in the iPhone SDK.
In this section, I will show you how you can convert an iPhone Web application into a native iPhone application.
First, deploy your Web application by clicking the Share item in Dashcode (see Figure 21). Click the Deploy button so that all the files of the application will be saved to a Web publishing directory. Take note of the Web publishing directory shown in Dashcode. It is saved in /Users//Sites/CurrencyConvertor/. You will make use of the files contained within this folder shortly.
Figure 21. Deploying a Web application in Dashcode
Launch Xcode and create a new View-based Application project. Name the project as CurrencyConvertor.
In Finder, navigate to the /Users//Sites/CurrencyConvertor/ folder and select the files shown in Figure 22.
Figure 22. All the project files created by Dashcode
Drag-and-drop all the selected files onto the Resources folder in Xcode. Xcode will prompt you with a dialog (see Figure 23). Check the Copy items into destination group's folder (if needed) checkbox and click Add.
Figure 23. Adding all the Dashcode files into the Resource folder in Xcode
Perform a global Find-and-Replace (by pressing Shift-Command-F). Search and replace the following strings with an empty string (see Figure 24):
" "Parts/"
" "Images/"
Figure 24. Replacing all instances of "Parts/" and "Images/" with an empty string
This will update the various HTML and JavaScript files that reference other files using the Parts/ and Images/ folder. Files stored in the Resources folder of your Xcode application have no directory structure when they are deployed; hence all the files are in a flat directory.
Select the files shown in Figure 25 and drag-and-drop them onto the Copy Bundle Resources (16) folder. This will ensure that all the HTML, JavaScript, CSS, and images files will be deployed together with your application.
Figure 25. Copying all the Web files into the targets folder so that they are deployed together with your application
In the CurrencyConvertorViewController.h file, add the following statements to define an outlet:
#import

@interface CurrencyConvertorViewController : UIViewController {
 IBOutlet UIWebView *webView;
}

@property (nonatomic, retain) UIWebView *webView;

@end
Double-click on the CurrencyConvertorViewController.xib file to open it in Interface Builder.
Add a WebView view to the View window and control-click and drag the File's Owner item to the WebView view (see Figure 26). Select webView.
Figure 26. Connecting an outlet to a view
In the CurrencyConvertorViewController.m file, add the following statements:
#import "CurrencyConvertorViewController.h"

@implementation CurrencyConvertorViewController

@synthesize webView;

- (void)viewDidLoad {
 NSString *path = [[NSBundle mainBundle] pathForResource:@"index"
                        ofType:@"html"];
 [webView loadRequest:[NSURLRequest requestWithURL:[NSURL fileURLWithPath: path
                            isDirectory:NO] ]];
    [super viewDidLoad];
}
That's it! Press Command-r to test the application on the iPhone Simulator. The Web application is now hosted within the WebView view (see Figure 27). What you have just done is convert a Web application into a native application!
Figure 27. Running the Web application as a native iPhone application
Summary
In this article, you have seen how easy it is to build Web applications for the iPhone using the Dashcode tool included in the iPhone SDK. Not only that, you have also learned how to convert a Web applications into a native application. If you are currently building Web applications for the iPhone, drop a note below to share with us what type of applications you are building.
http://mobiforge.com/developing/story/build-web-apps-iphone-using-dashcode

 Just because the Gmail web interface went down doesn't mean that Gmail is entirely down—often you can continue to access your account using one of the alternate web interfaces, which often are still accessible even when the regular web interface goes down.
 You can access the mobile phone versions of Gmail from your desktop computer, although they are very stripped down and lacking features. You'll be better off with the Plain HTML version, but in a pinch you can try the regular mobile version
 If you haven't already checked out the
  During the last Gmail outage, IMAP and POP3 access weren't affected at all, so those using a desktop or mobile client to access their email were still able to send and receive without even knowing there was an issue. Even if you use the web interface as your primary method of email access, it's a good idea to at least keep a
  Gmail doesn't have to go down globally for your email access to be cut off—your internet could go down, or your account could even be disabled. Whatever the case, it's a good idea to have a backup plan just in case the worst should happen.
 Introduction
 Whether you need a poster to use for a presentation or a cheat card to keep by your monitor, TechPosters has a sizable archive of posters, diagrams, reference charts, and cheat sheets.
 iPhone/iPod touch only: Apple today announced an update to iPhone OS 3.1 today, introducing a new 'Genius' recommendation feature for the App Store. bug fixes and performance boosters, and several other small but worthwhile updates.

